
Mobile
Developing a native Android App using Groovy
September 4th, 2014
Simple Android app using Groovy
Object Partners
Android L introduced “Screen Pinning” API. This allows an application to temporarily restrict a user from navigating away from your activity. When Screen Pinning in enabled, it restricts a user from gaining access to notification bar on top as well as the navigation bar at the bottom. Prior to Android L, developers had to hack around in order to build a kiosk type application. Those workarounds included making the application a “default launcher”, write code to forcefully close the notification bar back up so users could not gain access to them. In this post we will go over the new API and build a simple Kiosk application that will show an informational product webpage. Users will not be able to navigate away from the activity or gain access to notification bar.
Getting Android L At the time of this writing Android L is still in preview. You can download and install Android L for Nexus 5/7. You can follow the steps at http://developer.android.com/preview/index.html#download. If you are new to flashing these images, please follow the flashing instructions posted here: https://developers.google.com/android/nexus/images#instructions After you have successfully flashed your device, you can follow along with this post and try out Screen Pinning.
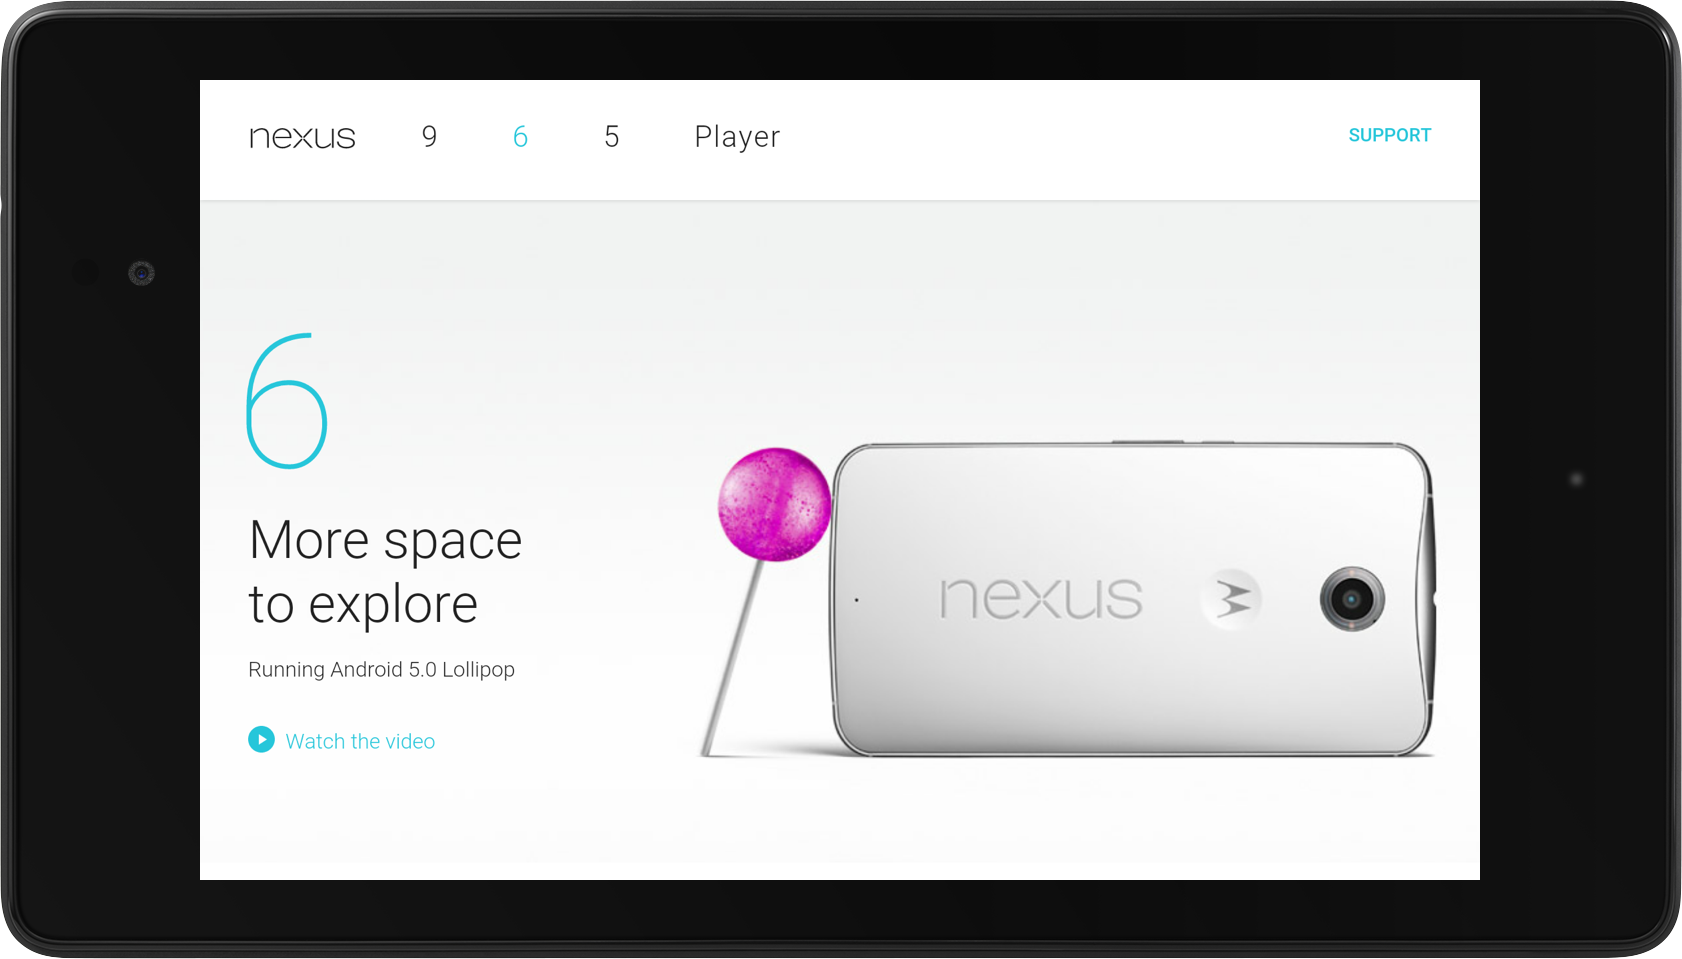
Building the application Lets begin by creating a simple android project. We set the compileSdkVersion to 21 in your build.gradle file. This builds using the Android 5.0 SDK. In the Android manifest set the permission to use Internet. This will allow our application to access the Internet to load the webpage.
android {
    compileSdkVersion 21
    buildToolsVersion "20.0.0"

    ...
}
<?xml version="1.0" encoding="utf-8"?>
<manifest xmlns:android="http://schemas.android.com/apk/res/android"
package="com.manijshrestha.lollipopkiosk">
...
<uses-permission android:name="android.permission.INTERNET" />
...
</manifest>In the layout file, add a WebView tag. We will load information about the latest Nexus 6 device on that webview component.
<RelativeLayout xmlns:android="http://schemas.android.com/apk/res/android"
    xmlns:tools="http://schemas.android.com/tools"
    android:layout_width="match_parent"
    android:layout_height="match_parent"
    tools:context=".KioskActivity">


   <WebView
       android:id="@+id/web_content"
       android:layout_width="match_parent"
       android:layout_height="match_parent" />


</RelativeLayout>
@Override
protected void onCreate(Bundle savedInstanceState) {
super.onCreate(savedInstanceState);
setContentView(R.layout.activity_kiosk);
mWebView = (WebView) findViewById(R.id.web_content);
mWebView.getSettings().setJavaScriptEnabled(true);
mWebView.loadUrl("http://www.google.com/nexus/6/");
}To take advantage of full screen we need to set Immersive mode. We do that by setting System UI flags in the DecorView.
 @Override
    protected void onPostCreate(Bundle bundle) {
        super.onPostCreate(bundle);


        getActionBar().hide();


        View decorView = getWindow().getDecorView();
        decorView.setSystemUiVisibility(
                View.SYSTEM_UI_FLAG_FULLSCREEN
              | View.SYSTEM_UI_FLAG_HIDE_NAVIGATION
              | View.SYSTEM_UI_FLAG_IMMERSIVE_STICKY);


        provisionOwner();
    }
On “onResume”, we will call the new method “startLockTask” which was introduced as part of Android L SDK. By calling that method, it will run the activity in Screen Pinning mode. Lets start the application. You should notice that we get a popup confirming Screen Pinning. Accept it to start Screen pinning.
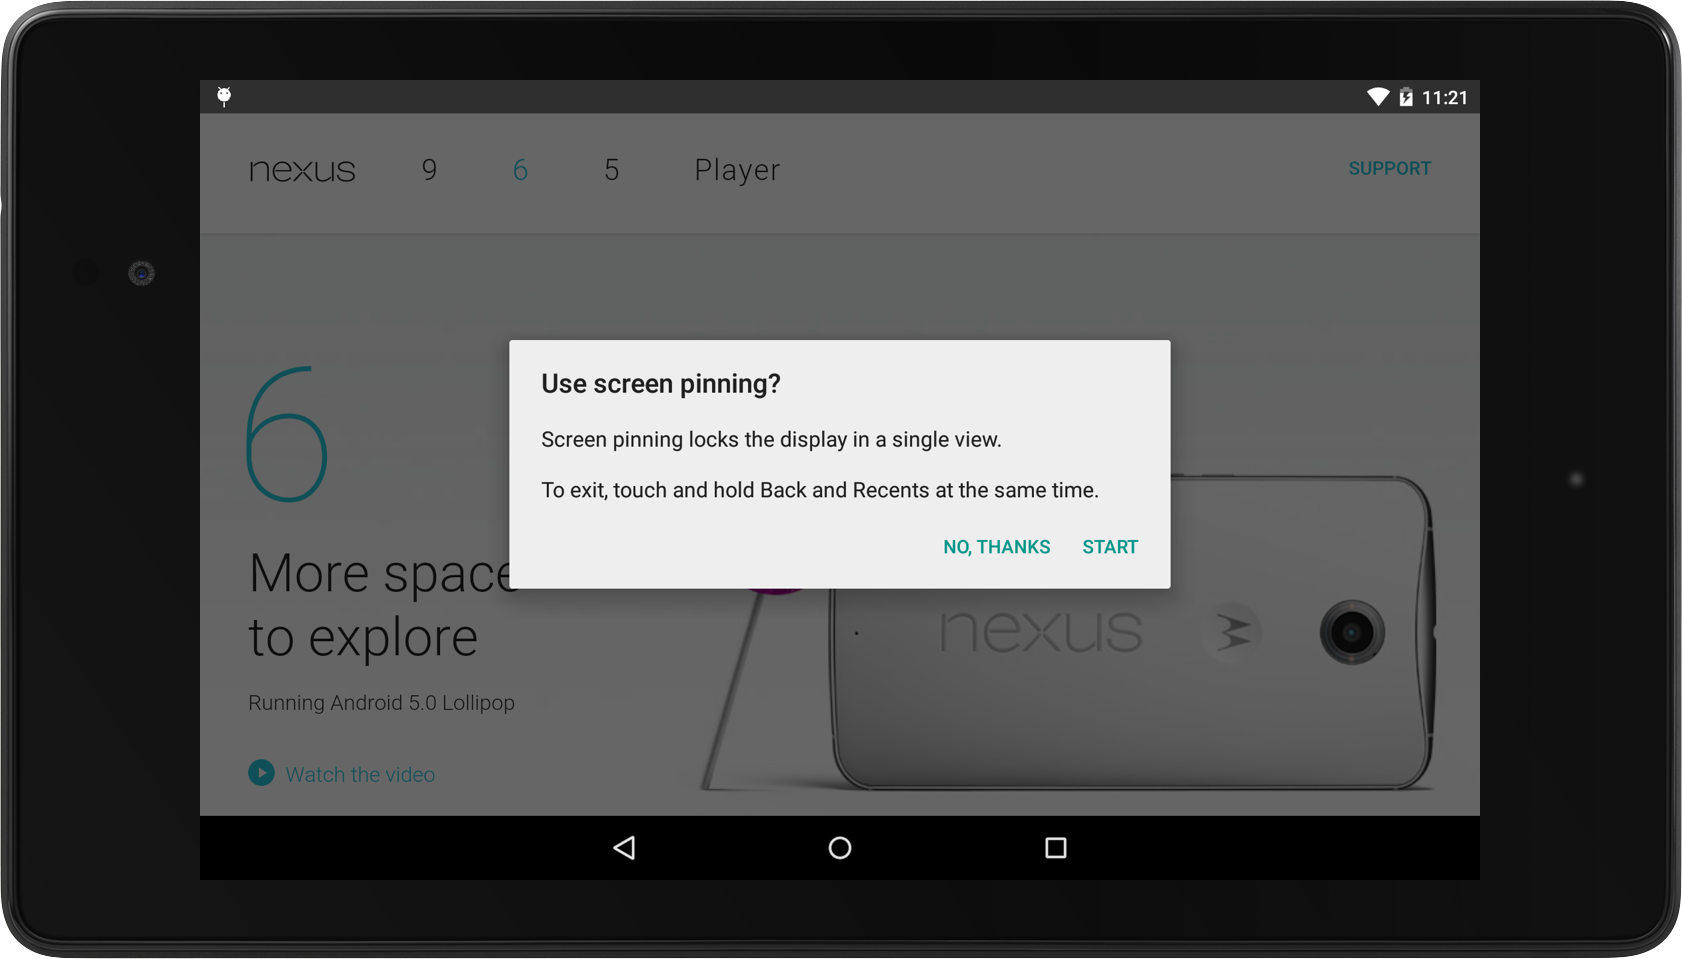
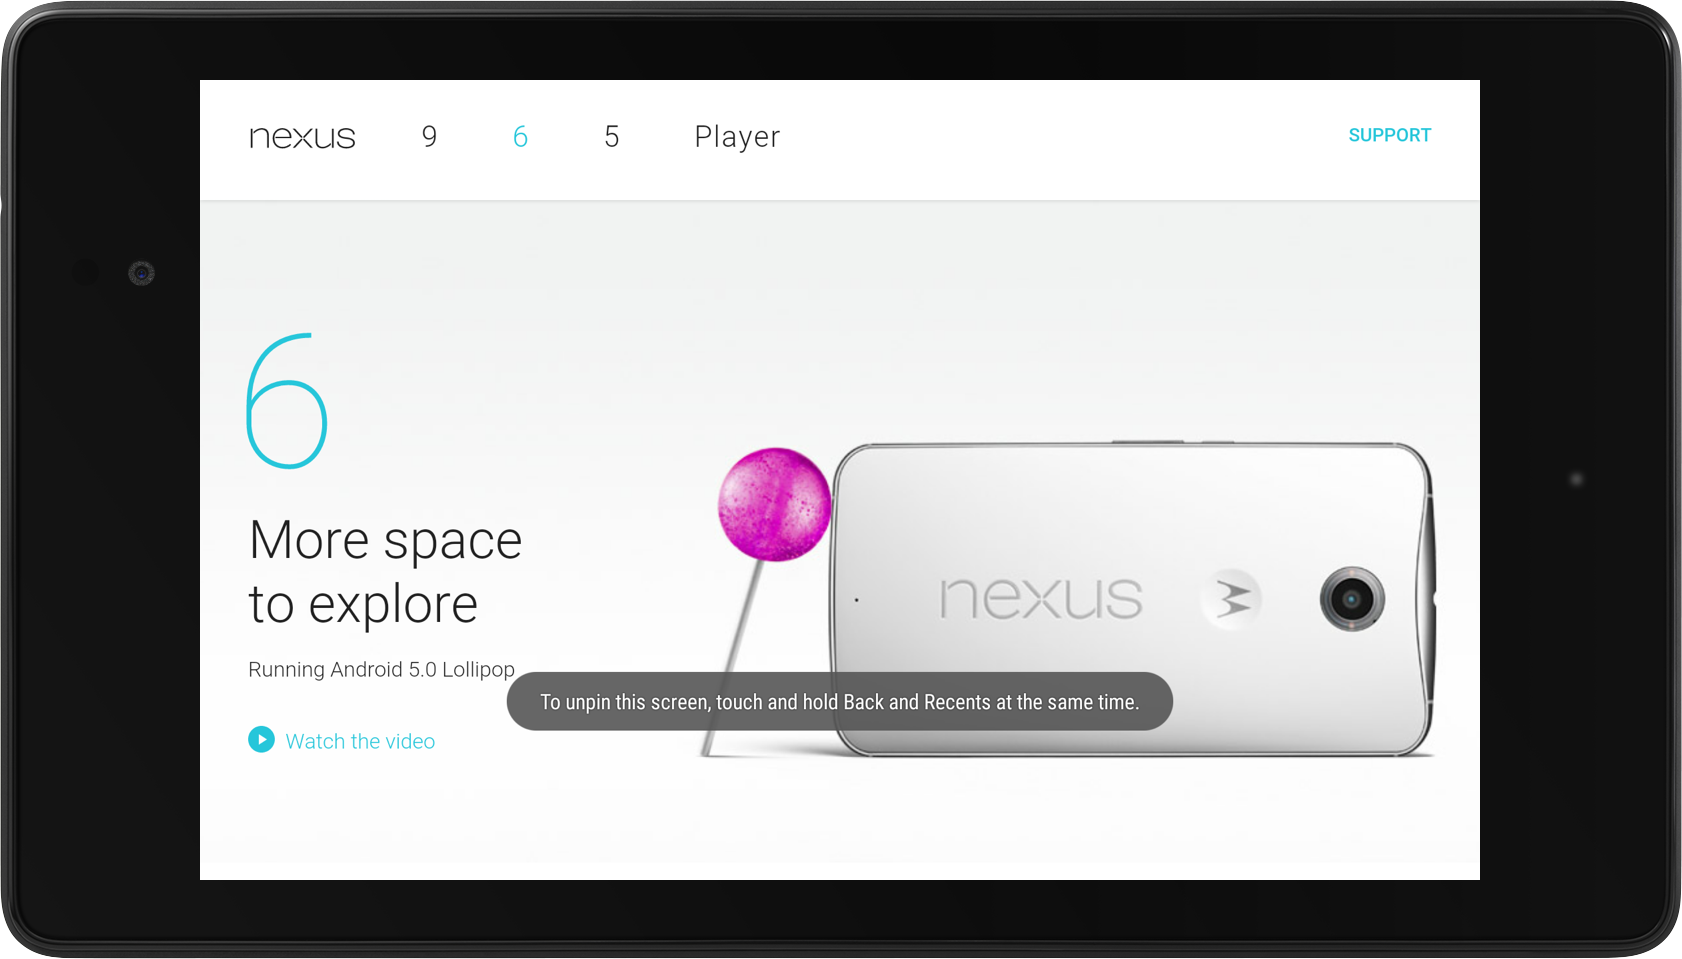
In this mode, pressing home, back or recents button does not do anything. By default pressing and holding back and recents button will get you out of screen pinning mode.
Above mode is perfect for apps that needs to restrict users from accessing the notification or navigation bar. Business apps used to display presentation for sales consultants, or educational apps that may need to restrict students from navigating away from the activity are good examples. In the new SDK, google introduced the concept of “Device Owner”. It is a specialized type of device administrator that has additional abilities to create/remove secondary user profiles and to configure global settings. The Device owner app can run screen pinning without the user confirmation we saw above. When Device owner app runs screen pinning, it needs to call “stopLockTask()” to get out of the screen pinning mode. As of this writing, there is no simple way to make an app, “device owner” without root. According to the documentation, Device owner mode can be set via NFC but there is no specific instructions as to how it can be done. (http://developer.android.com/about/versions/android-5.0.html#DeviceOwner) To try out the capability of a device owner, you can root your device and set an app as a device owner. To do this, you would need to create a deviceowner.xml file and place it in /data/system folder. You can do this by following the steps below on a rooted device: (You can finds steps to root Nexus 7 with Android L on the internet) Create a deviceowner.xml, copy it over to /data/system Example device_owner.xml
<?xml version="1.0" encoding="utf-8" standalone="yes" ?>
<device-owner package="com.manijshrestha.lollipopkiosk" name="Task Pinning" />
cp /sdcard/deviceowner.xml /data/system chown system:system deviceowner.xml (App with the package name described in device_owner.xml must be present on the device before you copy the xml to it) Lets modify our application to request device administrator access. To do so we will need to create a receiver class that extends DeviceAdminReceiver class. We will define an empty implementation as we don’t need to do anything specific as an administrator, except for being an administrator.
package com.manijshrestha.lollipopkiosk;


import android.app.admin.DeviceAdminReceiver;
import android.content.ComponentName;
import android.content.Context;


public class BasicDeviceAdminReceiver extends DeviceAdminReceiver {


    public static ComponentName getComponentName(Context context) {
        return new ComponentName(context.getApplicationContext(), BasicDeviceAdminReceiver.class);
    }


}
Define the receiver in the AndroidManifest.xml file:
<receiver
            android:name=".BasicDeviceAdminReceiver"
            android:label="@string/admin_permission_label"
            android:description="@string/admin_permission_description"
            android:permission="android.permission.BIND_DEVICE_ADMIN">


            <meta-data android:name="android.app.device_admin"
                android:resource="@xml/device_admin" />


            <intent-filter>
                <action android:name="android.app.action.DEVICE_ADMIN_ENABLED" />
            </intent-filter>
        </receiver>
After that is defined, in our activity we can request to be an “Administrator” if it isn’t already.
 private void provisionOwner() {
        DevicePolicyManager manager =
                (DevicePolicyManager) getSystemService(Context.DEVICE_POLICY_SERVICE);
        ComponentName componentName = BasicDeviceAdminReceiver.getComponentName(this);


        if(!manager.isAdminActive(componentName)) {
            Intent intent = new Intent(DevicePolicyManager.ACTION_ADD_DEVICE_ADMIN);
            intent.putExtra(DevicePolicyManager.EXTRA_DEVICE_ADMIN, componentName);
            startActivityForResult(intent, 0);
            return;
        }


        if (manager.isDeviceOwnerApp(getPackageName()))
            manager.setLockTaskPackages(componentName, new String [] {getPackageName()});
    }
In “provisionOwner()” method, we request to be device administrator. We then enable the application to call startLockTask. When our modified application starts screen pinning, the only way to get out of that mode is by calling “stopLockTask()“. Lets do that when the back button is pressed. (You can make it so the user needs to enter a pin code etc before screen pinning is disabled, for this demo we will call it when user presses the back button)
 @Override
    public void onBackPressed() {
        stopLockTask();
    }
If you run the app now, app will automatically go into screen pinning mode. (Notice no confirmation dialog is shown) When you hit back would get you out of the screen pinning.


You can find the source of the sample at https://github.com/manijshrestha/LollipopKiosk
Simple Android app using Groovy
A quick tip showing how to add custom locations to your app for testing CLLocation services in the iOS simulator.
CocoaPods is the dependency manager we use at Object Partners to integrate open source iOS libraries. We also use it to manage private libraries for our iOS apps.
Insert bio here


